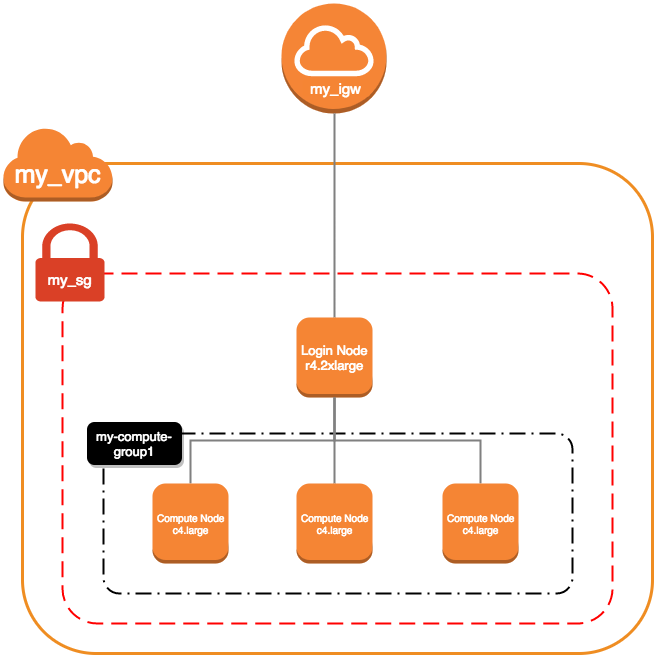
Setting Up AWS Environment for HPC Platform
HPC platforms can be deployed in the cloud instead of on local hardware. While there are many cloud providers out there, this guide focusses on setting up login and compute nodes in the cloud on the AWS platform.
General Network Setup
AWS has a command line tool that can be used to create and manage resources. These will need to be run from a Linux/Mac machine.
Create a VPC for the network:
aws ec2 create-vpc --cidr-block 10.75.0.0/16
Note
Optionally, a name tag can be created for the VPC (which can make it easier to locate the VPC through the AWS web console) with aws ec2 create-tags --resources my_vpc_id --tags Key=Name,Value=Name-For-My-VPC
Create a security group (replacing
my_vpc_idwith the VpcId from the above command output):aws ec2 create-security-group --description my-sg1 --group-name my-sg1 --vpc-id my_vpc_id
Create a file
sg-permissions.jsonin the current directory with the following content:[ { "IpProtocol": "-1", "IpRanges": [ { "CidrIp": "10.75.0.0/16" } ] }, { "IpProtocol": "tcp", "FromPort": 22, "ToPort": 22, "IpRanges": [ { "CidrIp": "0.0.0.0/0" } ] }, { "IpProtocol": "tcp", "FromPort": 443, "ToPort": 443, "IpRanges": [ { "CidrIp": "0.0.0.0/0" } ] }, { "IpProtocol": "tcp", "FromPort": 80, "ToPort": 80, "IpRanges": [ { "CidrIp": "0.0.0.0/0" } ] } ]
Add rules to security group (replacing
my_sg_idwith the GroupId from the above command output):aws ec2 authorize-security-group-ingress --group-id my_sg_id --ip-permissions file://sg-permissions.json
Define subnet for the VPC (replacing
my_vpc_idwith the VpcId from earlier):aws ec2 create-subnet --vpc-id my_vpc_id --cidr-block 10.75.0.0/16
Create an Internet gateway:
aws ec2 create-internet-gateway
Attach the Internet gateway to the VPC (replacing
my_igw_idwith InternetGatewayId from the above command output):aws ec2 attach-internet-gateway --internet-gateway-id my_igw_id --vpc-id my_vpc_id
Locate route table for the VPC:
aws ec2 describe-route-tables --filters Name=vpc-id,Values=my_vpc_id
Create a route within the table (replacing
my_rtb_idwith RouteTableId from the above command output):aws ec2 create-route --route-table-id my_rtb_id --destination-cidr-block 0.0.0.0/0 --gateway-id my_igw_id
Create a file
ec2-role-trust-policy.jsonin the current directory with the following content:{ "Version": "2012-10-17", "Statement": [ { "Effect": "Allow", "Principal": { "Service": "ec2.amazonaws.com"}, "Action": "sts:AssumeRole" } ] }
Create autoscaling role:
aws iam create-role --role-name autoscaling --assume-role-policy-document file://ec2-role-trust-policy.json
Create a file
ec2-role-access-policy.jsonin the current directory with the following content:{ "Version": "2012-10-17", "Statement": [ { "Effect": "Allow", "Action": [ "autoscaling:DescribeAutoScalingGroups", "autoscaling:SetDesiredCapacity", "autoscaling:UpdateAutoScalingGroup", "autoscaling:TerminateInstanceInAutoScalingGroup", "ec2:DescribeTags" ], "Resource": [ "*" ] } ] }
Set role policy for above role:
aws iam put-role-policy --role-name my-autoscaling-role --policy-name My-Autoscaling-Permissions --policy-document file://ec2-role-access-policy.json
Create instance profile for autoscaling:
aws iam create-instance-profile --instance-profile-name autoscaling
Join the role and instance profile:
aws iam add-role-to-instance-profile --instance-profile-name autoscaling --role-name autoscaling
Create a file
mapping.jsonin the current directory with the following content:[ { "DeviceName": "/dev/sda1", "Ebs": { "DeleteOnTermination": true, "SnapshotId": "snap-00f18f3f6413c7879", "VolumeSize": 20, "VolumeType": "gp2" } } ]
Autoscaling Group Configuration
Setup autoscaling launch configuration (
ami-061b1560is the ID for the Official CentOS 7 minimal installation):aws autoscaling create-launch-configuration --launch-configuration-name my-compute-group1 --image-id compute_node_template_ami_id --key-name my_key_pair --security-groups my_sg_id --associate-public-ip-address --iam-instance-profile my-autoscaling-profile --instance-type c4.large --spot-price 0.113
Create autoscaling group which can scale from 0 to 8 nodes and initially starts with 1:
aws autoscaling create-auto-scaling-group --auto-scaling-group-name my-compute-group1 --launch-configuration-name my-compute-group1 --vpc-zone-identifier my_subnet_id --min-size 0 --max-size 8 --desired-capacity 1
Node Creation Example
Create node (
ami-061b1560is the ID for the Official CentOS 7 minimal installation, replacemy_key_pair,my_sg_idandmy_subnet_idwith the related values from earlier commands):aws ec2 run-instances --image-id ami-061b1560 --key-name my_key_pair --instance-type r4.2xlarge --associate-public-ip-address --security-group-ids my_sg_id --block-device-mappings file://mapping.json --subnet-id my_subnet_id --iam-instance-profile Name=my-autoscaling-profile
Wait for node to launch (
instance_idbeing the ID from the above command):aws ec2 describe-instances --instance-id instance_id | jq '.Reservations[0].Instances[0].State.Name'
Identify public IP for the node to login to (
instance_idbeing the ID from the above command):aws ec2 describe-instances --instance-id instance_id |jq '.Reservations[0].Instances[0].PublicIpAddress'
Controller Node Setup
- Follow Node Creation Example
- Follow Metalware Install
Repository Node Setup
- Follow Node Creation Example
- Follow Repo Configuration
Storage Node Setup
- Follow Node Creation Example
- Follow Storage Configuration
User Management Setup
- Follow Node Creation Example
- Follow User Management Setup
Monitor Node Setup
- Follow Node Creation Example
- Follow Monitor System Setup